Batch Distribution Rule
Distribution rules offer you a means of controlling how Order items should be grouped and transmitted to vendors for fulfillment.
Access Distribution Rules
Click on the Order Management then Distribution Rules menu option.

How Batch Jobs Work
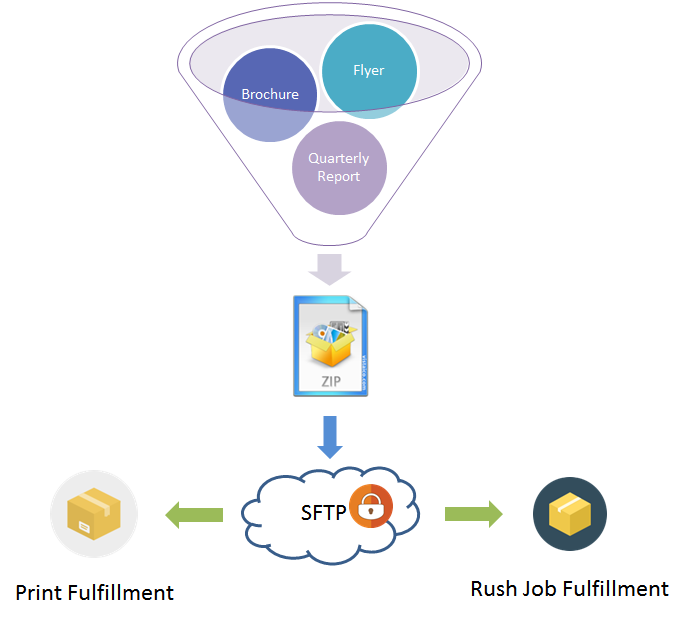
As seen in the diagram above, batch jobs allow you to:
- Group items together using Distribution Rules
- ContentWelder will securely transmit the file to the vendor of your choice so that jobs can be fulfilled.
How to Create a Distribution Rule
- Navigate over the Create Distribution Rule option and choose the Batch option as shown below.

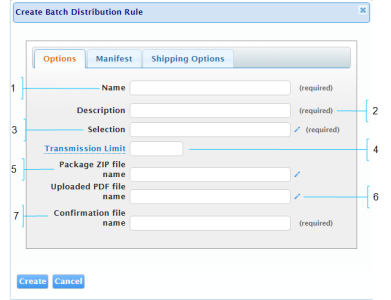
- A window will open prompting you to provide information necessary for batch transmission.
Options Tab
| Name | Description | |
| 1 | Rule Name | The Name of this Distribution Rule. |
| 2 | Rule Description |
A longer description of this rule. A best practice is to enter a non technical description so that users not as familiar with JavaScript can interpret the rule. |
| 3 | Selection |
The search criteria that must be met by an Order Item before this rule can be applied Example You could enter a selection to where any orders items whose price is over $5,000 must go to a special vendor. Expressions The pencil icon represents a field that accepts a JavaScript expression. Read "JavaScript expression" for more information. |
| 4 | Transmission Limit | The number of times ContentWelder should try transmitting this item before it stops transmitting the item. Leave this field empty if you want ContentWelder to keep trying to transmit the item. This is the default setting. |
| 5 | Package Zip Name |
The name of the 'zip' file that will be placed on the vendor's SFTP site during transmission. Note: Typically, a vendor will have an automated process that looks for a specific file to process. With this option, you can have the system push a file that meets the Vendors needs. |
| 6 | Uploaded PDF File Name |
The naming format for the PDF file (if applicable) that is transmitted to the vendor. By default the naming convention is [OrderItem.ID]. |
| 7 | Confirmation File Name |
The name of the confirmation file the vendor will provide for providing status updates. Note: The vendor can simply place a file with a matching name, and GDP will periodically poll the SFTP location for a Confirmation file. If it finds the file, it will ingest it and process it. If you use a confirmation file, make sure that the user that logs in has read access to the folder that holds the confirmation file. |
Manifest Tab
The manifest tab allows you to define the format and values for the csv file sent to the vendor.
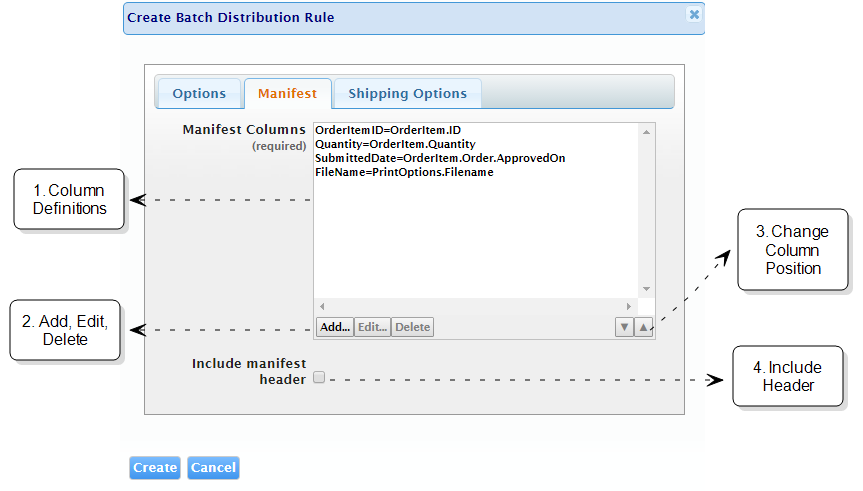
| Name | Description | |
| 1 | Column Definitions |
Here you can add column definitions that suit your vendor's needs. We recognize that each vendor may have an already 'in place' process that is setup with the ability to add process files following a specific format. With the ability to add your own columns, the need for further integration with a vendor is reduced. |
| 2 | Add, Edit & Delete |
These buttons allow you to add, edit and delete columns in the manifest file. Clicking Add or Edit will open the following prompt.
|
| 3 | Change Column Position |
▲ moves a column up by one. ▼ moves a column down by one. |
| 4 | Include Header | If checked, the first row in the manifest file will include the column header labels for each column. |
Shipping Options Tab
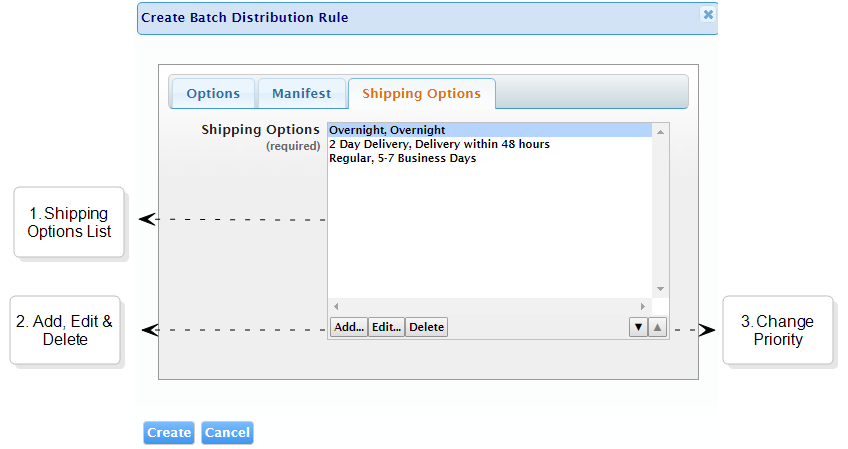
The shipping options tab allows you to configure what delivery time-frames are made available to the end user for Order Items that match this Distribution Rule.
Example
Let's say your company has a brochure product that requires extra lead time for the vendor to produce it.
By specifying the delivery options at the specific Distribution Level, the user is made aware up front that for a particular item, a product may take longer to be produced.
| Name | Description | |
| 1 | Shipping Options List | Here you will see the list of shipping options for this Distribution Rule. If the list is empty, it means none have been created. |
| 2 | Add, Edit & Delete |
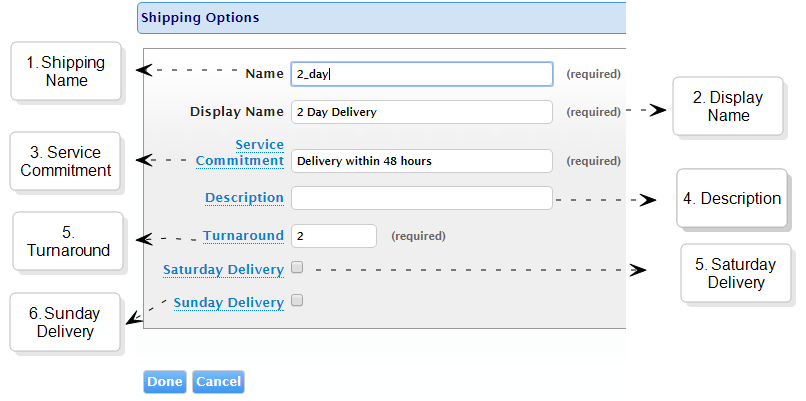
Buttons to allow you to add, edit and delete columns in the manifest file. Clicking Add or Edit will open the following prompt.
|
| 3 | Change Column Position |
▲ moves a shipping option up by one. ▼ moves a shipping option down by one. |
